Table of Contents
0. Introduction
In this article, I’ll detail my experience deploying a simple application on AWS. Since it was my first time working with AWS (and cloud in general), I didn’t use any IaC language, so the entire setup was done through the AWS console. I’m planning to recreate this deployment using Terraform in the future.
But before talking about my AWS experience, I’ll give you an overview of the application itself.
1. The application
Since the application was not the focus on this project, I built a simple URL shortener and divided it in two components: backend and frontend. Its source code can be found here.
1.1 Backend
The backend was built using Spring Boot. Its core functionality is to take a long URL and generate a short code, mapping it back to the long URL. To add another feature, I decided to make the short codes expire 7 days after their creation.
To implement this expiration date, I chose to use MongoDB as my database, since it has built-in TTL (time to live) indexing and can be easily integrated with Spring Boot by adding a dependency named Spring Data MongoDB.
With that said, let’s define our entity model:
@Document(collection = "url")
@Setter
@Getter
@NoArgsConstructor
@AllArgsConstructor
public class UrlModel {
    @Id
    private String id;

    private String longUrl;
    private String shortCode;

    @Indexed(name = "expirationDate_ttl", expireAfter = "0s")
    private Date expirationDate;
}
As you can see, the model is quite straightforward: an ID managed by MongoDB, two strings used to map to each other and an expirationDate indexed by the database.
A detailed review of the API’s internal logic is beyond the scope of this article. For our purposes, it’s sufficient to understand its interface, just as the frontend does.
The server listens on port 8080 and exposes two endpoints:
/api/shorten: given a long URL, it returns a short code mapping back to the url./{shortCode}: given a short code, it redirects the user to the corresponding long URL.
Only one thing in this project is simpler than our backend: our frontend.
1.2 Frontend
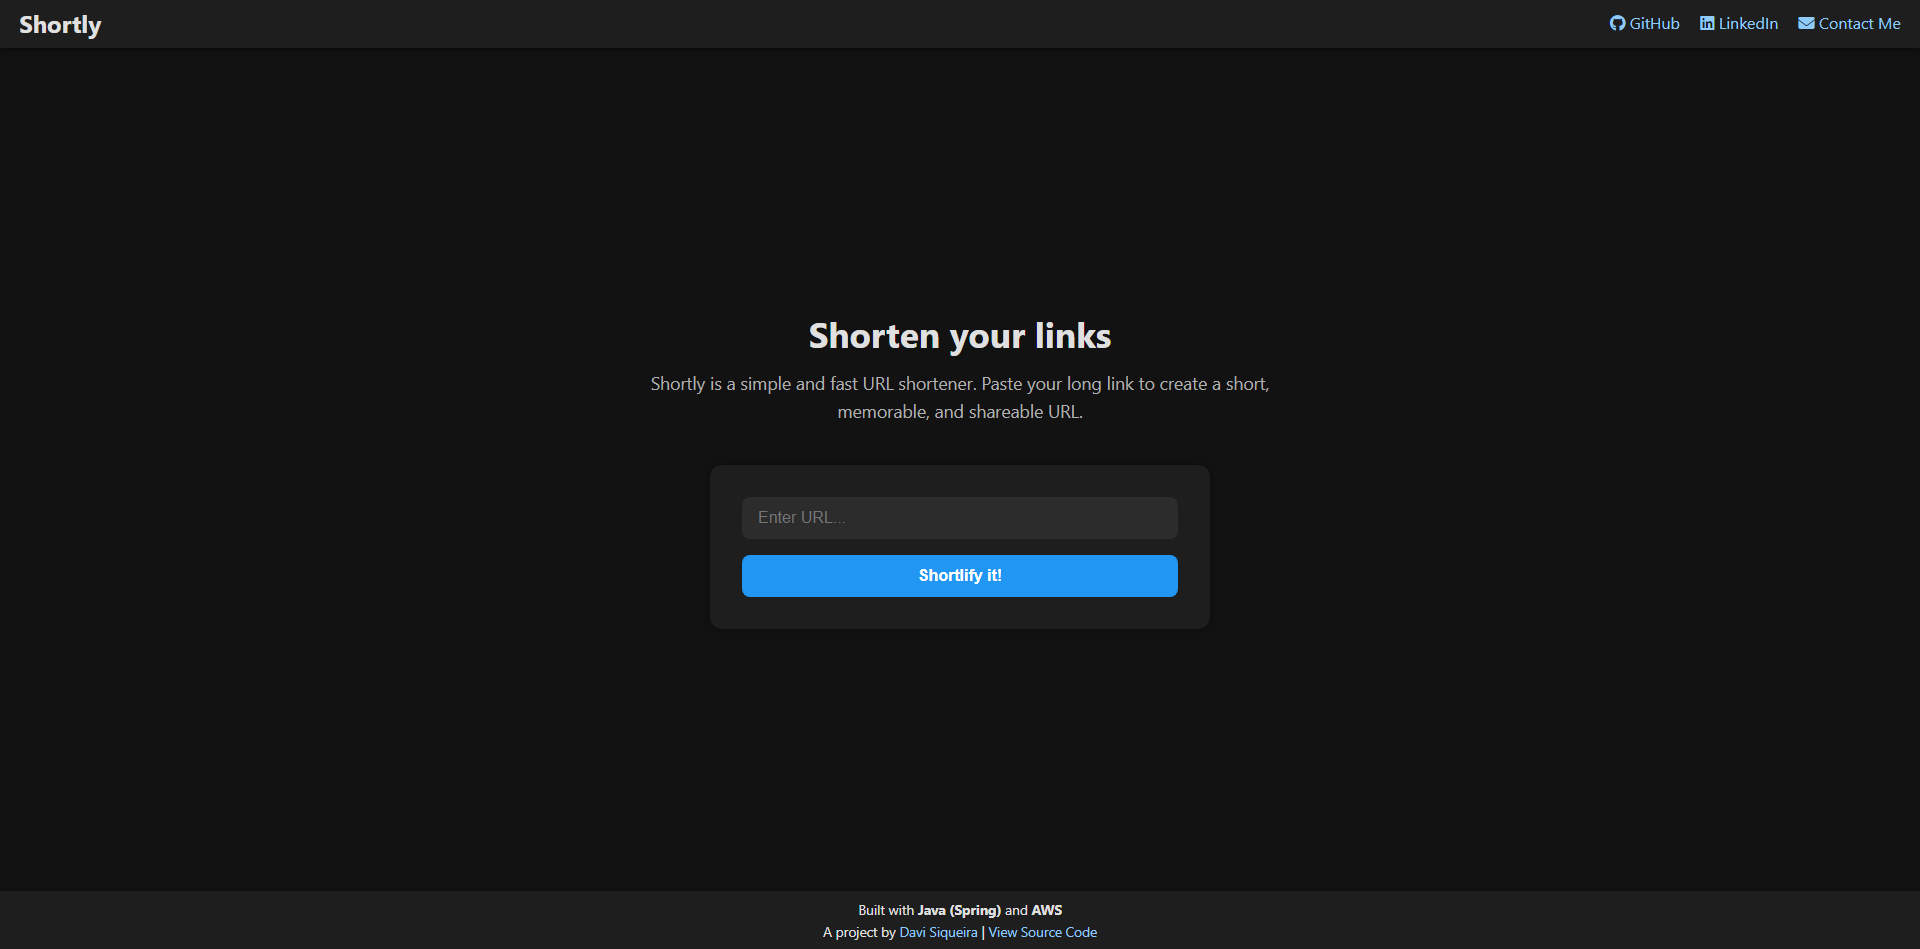
The frontend was so simple that I built it using HTML, CSS, and JavaScript.
One page, one input and one button: that’s all we need.
2. Deploying it on AWS
Let’s start our really long journey by defining what’s our goal.
At the end of this article we’ll have configured two routes of services:
- Frontend: User -> CloudFront -> S3
- API calls: Frontend -> ALB (Load Balancer) -> Nginx (EC2) -> Spring Boot -> MongoDB
So, let’s cut to action.
2.1 Unexpected start: database deployment
To start our journey deploying things on AWS we’ll host our MongoDB on… (drum roll) … MongoDB Atlas!!!!
I know, I know, MongoDB Atlas isn’t an AWS service… I know, you can stop throwing tomatoes at me now.
That’s the only regret I have on this project: I didn’t plan the whole thing when I was coding the backend. As I told you in the beginning of this article, it was my first time working with AWS, so I didn’t know they don’t have a (N)RDS service.
I know you can install and run MongoDB on an EC2 instance, but that was not my goal. Didn’t use DynamoDB too (but I’m planning to try it in the future!), so the last option was hosting it on MongoDB Atlas.
Side note: as I was writing this, I found out that AWS offers a service that emulates MongoDB, it’s called DocumentDB.
The step-by-step is straightforward: just create an account and instantiate a flex cluster.
2.2 You can’t run from linux: backend deployment with EC2
And we can finally start our AWS journey.
2.2.1 Lauching our EC2
Amazon Elastic Compute Cloud (EC2) is AWS’s service for running virtual servers in the cloud. It allows you to provision computing power on demand, choose your preferred operating system, configure hardware resources, and deploy applications just like you would on a physical server, but with the flexibility and scalability of the cloud.
In our case, we’ll use it to run our application’s backend 24/7.
To launch an EC2 instance, go to EC2 -> Instances -> Launch instance.
Instance setup:
- Name: …
- AMI: Ubuntu Server 22.04 LTS
- Instance type: t3.micro
- Key pair: generate and save your key, we’ll use it to remotely connect to our instance
- Security Group (SG): create a SG and allow the following protocols/IPs:
- SSH (22): accept connections only from your IP.
- HTTP (80): accept connections from all origins (0.0.0.0/0).
- Storage: 15gb / gp3
Launch and wait for it to become available. We’ll connect to our EC2 remotely using SSH and the key pair generated on the setup (I hope you stored it).
To connect, simply run this command in your terminal:
ssh -i your-key.pem ubuntu@your-ec2-public-ip-i your-key.pem: selects a file from which the identity (private key) for public key authentication is read- Your EC2 public IP can be found on the details tab
Now we are inside our EC2 instance!
First, we need to update our linux packages and install some dependencies:
sudo apt update && sudo apt -y install openjdk-21-jdk nginxYou’ll probably need to reboot your system, so run this command and wait a bit before trying to connect to your EC2 again:
sudo rebootNow that everything is up-to-date, it’s time to get our application running.
2.2.2 Creating a dedicated service and user to run our application
To increase the system security, we’ll run our application in a more isolated environment. This approach involves two key components:
- A dedicated service with hardening actions.
- A dedicated user that will have limited permissions:
- Access the application folder
- Run the service
- Run the .jar file
First, we need to get our application .jar file.
To generate it, go to our backend directory and run the following maven command:
mvn packageOur .jar file will be generated on the /target directory.
To send it to our EC2, we need to use the following scp (Secure Copy Protocol) command:
scp -i your-key.pem your-jar.jar ubuntu@your-ec2-public-ip:/home/ubuntuThis will copy the .jar file to the home directory of the ubuntu user on your EC2 instance.
Now that we have our application file, let’s create a dedicated user to run our service:
sudo useradd -s /usr/sbin/nologin userapp-s /usr/sbin/nologin: sets the user’s shell to a non-interactive shell, preventing anyone from logging in as this user.userapp: user’s name
We’ll create a directory to store our .jar file and give folder ownership to our dedicated user:
sudo mkdir -p /opt/userapp &&
sudo chown userapp:userapp /opt/userapp
Move the .jar to our application directory and give file ownership to our dedicated user:
sudo mv /home/ubuntu/your-jar.jar /opt/userapp/app.jar &&
sudo chown userapp:userapp /opt/userapp/app.jar
To store environment variables safely, we’ll create a dedicated file and only grant read/write permission to root:
sudo touch /etc/urlapp.env &&

sudo bash -c 'cat > /etc/urlapp.env' <<'EOF'
MONGODB_URI="mongodb+srv://user:pwd@cluster.mongodb.net/db"
PORT=8080
cors.allowed-origins={frontend-domain.com}
spring.data.mongodb.auto-index-creation=true
EOF &&

sudo chmod 600 /etc/urlapp.env
-c '...': will not open a shell. Instead, it’ll run the following string as a commandchmod 600: sets the file permissions so that only the owner (the root user, in this case) has read and write access
Now that our directories were created and the permissions were set, we’ll create a systemd unit file to define our service:
sudo touch /etc/systemd/system/urlapp.serviceOur service definition will look like this:
Side note: I’ve added comments to make the file easier to understand.
sudo bash -c 'cat > /etc/systemd/system/urlapp.service' <<'EOF'
[Unit]
Description=URL Shortener
# The service will start after the network is online.
After=network-online.target
Wants=network-online.target

[Service]
# Defines service user and group
User=userapp
Group=userapp

# Environment variables file to be loaded into the service process.
EnvironmentFile=/etc/urlapp.env

WorkingDirectory=/opt/urlapp
ExecStart=/usr/bin/java -jar /opt/urlapp/app.jar

# Treat exit code 143 (SIGTERM) as a successful, clean shutdown.
SuccessExitStatus=143

# If the process crashes, systemd will restart the service.
Restart=always
RestartSec=3

LimitNOFILE=65535

# Hardening (isolate the process from the system)

NoNewPrivileges=true
ProtectSystem=strict
ReadWritePaths=/opt/urlapp
ProtectHome=true
PrivateTmp=true
PrivateDevices=true
ProtectHostname=true
ProtectClock=true
ProtectKernelTunables=true
ProtectKernelModules=true
ProtectControlGroups=true
LockPersonality=true

# Tends to break Java projects because the JVM cannot allocate executable memory.
# Error example: Failed to mark memory page as executable - check if grsecurity/PaX is enabled
# MemoryDenyWriteExecute=true

[Install]
WantedBy=multi-user.target

EOF
Now, let’s tell systemd about our new service and get it running:
sudo systemctl daemon-reload &&
sudo systemctl enable urlapp &&
sudo systemctl start urlapp
To check our service status, run:
sudo systemctl status urlappAt this point, everything should be running smoothly, without problems. If the service is inactive (or has failed), we can check our service logs with the following command:
journalctl -u urlapp -f-f: “tails” the log, showing new lines in real-time
2.2.3 Nginx setup
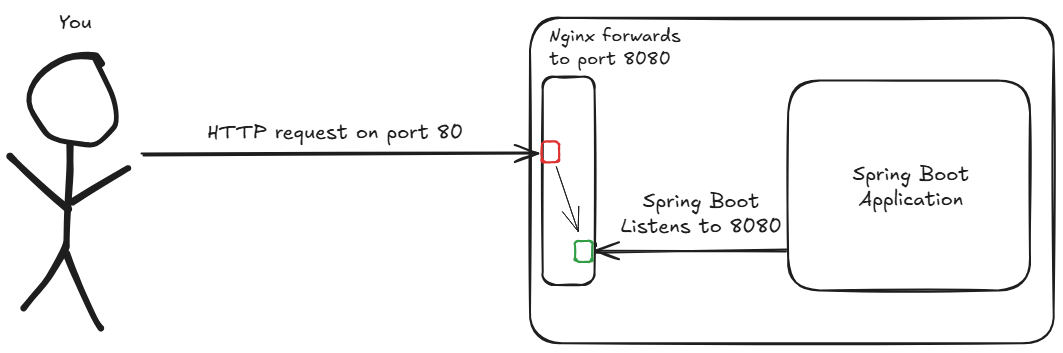
If you’re paying attention to what we’re doing, you might be asking yourself a question: “Okay, our application is running on our EC2, but how are we going to communicate with it if it’s listening on port 8080, but we only exposed port 80?”.
To answer this question, we need to understand what is Nginx.
Nginx is a lightweight, high-performance HTTP web server that can do many things (you can check them out in the link above). In short, we’ll use it as a reverse proxy. This means Nginx will sit in front of our application, receive all incoming traffic on port 80, and forward it to our Spring Boot application running internally on port 8080.
Here’s a simple diagram showing how this works:
Additionally, we’ll add:
- A
/healthroute to check Nginx status - A rate limit of 10 requests per second
- Some timeout and buffers to deal with our backend requests.
First, remove the default Nginx configuration:
sudo rm /etc/nginx/sites-enabled/defaultOur nginx configuration file will look like this:
Side note: I’ve added comments to make the file easier to understand.
sudo bash -c 'cat > /etc/nginx/sites-available/url' <<'EOF'
server {
  # Listen on port 80 as the default server.
  listen 80 default_server;
  # Accepts any host name.
  server_name _;

  # Health check route.
  location /health {
    default_type application/json;
    return 200 '{"status": "UP"}';
  }

  location / {
    # Uses the 'rl' zone that will be defined in nginx's http{} config.
    limit_req zone=rl burst=20 nodelay;
    # burst=20: allow up to 20 requests above the rate.
    # nodelay: do not delay requests within the burst and reject requests beyond the burst.

    # Forward to the backend on port 8080.
    proxy_pass http://127.0.0.1:8080;
    # Preserve original host header.
    proxy_set_header Host $host;
    # Preserve original client IP.
    proxy_set_header X-Forwarded-For $proxy_add_x_forwarded_for;
    # Preserve original protocol.
    proxy_set_header X-Forwarded-Proto $scheme;

    # Upstream (backend) timeouts and buffering.
    # Maximum time to establish a TCP handshake.
    proxy_connect_timeout 5s;
    # Maximum time between two successive write operations to the upstream.
    proxy_send_timeout 60s;
    # Maximum time between two successive read operations from the upstream.
    proxy_read_timeout 60s;
  }
}
EOF
Before activating our configuration file, we need to define the rate limit zone and enable gzip compression.
To do this, add these lines to the http{} block in /etc/nginx/nginx.conf file:
# Creates the rate limit zone (10req/s)
limit_req_zone $binary_remote_addr zone=rl:10m rate=10r/s;

# Enables gzip compression.
gzip on;
gzip_min_length 1024;
gzip_types text/plain text/css application/json application/javascript application/xml image/svg+xml;
Let’s activate our new configuration by creating a symbolic link in our /etc/nginx/sites-enabled/ directory:
sudo ln -sf /etc/nginx/sites-available/url /etc/nginx/sites-enabled/urlRestart nginx to make changes:
sudo nginx -t && sudo systemctl reload nginxYou can check our reverse-proxy functioning by sending a request to the health check route:
curl -v http://your-ip/healthIt should return 200.
With that, we’re done with our EC2 setup!
2.3 The easy part: frontend deployment with S3
Amazon Simple Storage Service (S3) is AWS’s highly scalable object storage service. It’s designed to store and retrieve any amount of data from anywhere, making it ideal for hosting static websites, storing backups, serving files, or acting as a content repository for applications. Data in S3 is organized into “buckets”, and each object is accessible via a unique (and very long) URL.
Creating an S3 bucket is pretty easy. In the AWS console, go to S3 -> Create bucket and fill in the basics:
- Type: General purpose
- Name: …
- Block all public access: uncheck it for now. Otherwise, our static site won’t be reachable. (we’ll enable this when configuring CloudFront.)
Next, we need an address to access our frontend from the browser. For that, enable “Static Website Hosting” under Bucket -> Properties.
- For SPAs (Single Page Applications), you can set the error page to be the same as the index page.
To make our bucket publicly readable, add the following policy:
{
  "Version": "2012-10-17",
  "Statement": [
    {
      "Sid": "PublicReadGetObject",
      "Effect": "Allow",
      "Principal": "*",
      "Action": ["s3:GetObject"],
      "Resource": ["arn:aws:s3:::BUCKET-NAME/*"]
    }
  ]
}- Version: policy syntax version, 2012-10-17 is the latest.
- Statement: list of rule declarations.
- Sid: identifier for the rule (optional, for readability only).
- Effect: indicates whether the rule allows or denies the defined actions (Action, below).
- Principal: defines who the rule applies to.
- Action: list of actions the rule allows or denies.
- s3:GetObject is the action of reading/downloading objects from the bucket.
- Resource: resources the rule applies to.
- A resource can be identified in two formats:
- arn:aws:s3:::BUCKET-NAME -> actions on the bucket itself.
- arn:aws:s3:::BUCKET-NAME/* -> actions on the objects inside the bucket.
- A resource can be identified in two formats:
Now that our S3 bucket is publicly readable, upload your frontend files (index.html, styles.css, script.js, etc) to the bucket. That way, we can access it from the Amazon’s long, auto-generated URL.
If you try to shorten a URL right now, you’ll probably see an error like “Failed to fetch.”. This happens because our frontend is making requests to our backend, but the browser is blocking them due to a CORS (Cross-Origin Resource Sharing) restriction. To fix this, we need to allow our frontend domain to talk to the backend. On our EC2 instance, update the cors.allowed.origins environment variable to include our new (very long) Amazon URL.
After updating our environment variable, everything should be looking good.
2.4 Wait, there’s more
You might be asking yourself: “Okay, we’ve deployed our frontend and backend and they can talk to each other. So… we’re done, right?”.
Not quite.
You’re right: we’ve deployed both ends and they can talk to each other. But our frontend URL is ridiculously long and the current architecture isn’t scalable or secure. To fix these issues, we’re going to add a few new layers that will make our application identifiable, scalable and safe.
I’m going to give you a simple roadmap of our next steps:
- Register our domain with Route 53
- Generate SSL/TLS certificates with ACM
- Create a Load Balancer and enable HTTPS
- Distribute our frontend globally with CloudFront (CDN)
2.5 Giving our application an address
In this section, we’ll point a custom domain name to our application. This allows users to access it through a memorable URL instead of a raw EC2 IP address.
To do it, we’ll use an AWS service named Route 53. It gives us the possibility to create hosted zones, which are responsible for storing the domain <-> IP address mapping. Essentially, a hosted zone provides you with a set of AWS name servers. Your job is to tell your domain registrar to use these AWS name servers.
Side note: Domain registrar is the place where the domain was purchased (it can be AWS itself). It keeps the domain registration and the configuration of which DNS servers manage it.
Since my domain was registered outside of AWS, it was necessary to manually create a hosted zone for it.
- If the domain had been registered through AWS, the hosted zone would have been created automatically.
To create your hosted zone, go to Route 53 -> Hosted zones -> Create hosted zone. The process is straightforward: just enter your domain name and select “Public hosted zone” as the type.
When created, the hosted zone comes with two default record types: NS and SOA.
- NS (Name Server): Lists the name servers responsible for the DNS zone.
- This is the crucial step: you must copy these name server values and update the settings at your domain registrar. This tells the internet that Route 53 is now in charge of your domain’s DNS records.
- SOA (Start of Authority): Defines the primary server for the zone, along with the administrator’s email and cache times.

Now, we need to create another record type: the A record.
- This record type is used to route traffic from a subdomain to an IP address.
- In our case, we created the subdomain
api.{your-domain}, pointing to the IP address of our EC2 instance.

To check if the subdomain now points to the correct IP address, simply run:
curl http://api.{your-domain}/health
If everything went well, we should get 200 response code.
2.6 Securing our domain with an SSL/TLS certificate
To start our security journey, we simply need to request a public SSL/TLS certificate, which enables HTTPS access from any client.
To get started, navigate to AWS Certificate Manager (ACM) and click “Request a certificate”.
For the fully qualified domain name, we’ll add api.{your-domain} (*.{your-domain} would work as a wildcard, covering all subdomains).
As the validation method, we’ll choose “DNS Validation”.
- This requires us to create a CNAME record in the hosted zone of our domain. Once the CNAME propagates, the certificate will be validated.
After submitting your request, the certificate status will be “Pending validation”. In the certificate’s details, you’ll find a section with the CNAME record you need to create.
To create our new CNAME record, go to Route 53 -> Select hosted zone -> Create record
- Record name: Value from the CNAME Name field without the domain at the end (Route 53 adds it automatically).
- Record type: CNAME
- Value: Value from the CNAME Value field.
- TTL: 300 (default).
Now, just wait for the CNAME to propagate across the DNS servers.
You can check propagation with the command:
nslookup -type=CNAME {CNAME_NAME}At first, the DNS servers won’t find the record and will respond with “Non-existent domain”. However, after propagation, the command will return:
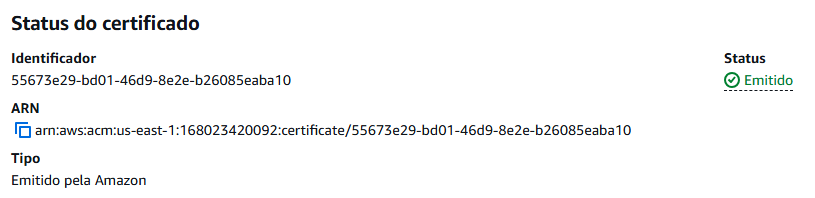
{CNAME_NAME} canonical name = {CNAME_VALUE}When this happens, ACM will automatically complete the validation within a few minutes, and the certificate will be issued.
2.7 From HTTP to HTTPS: the Load Balancer way
You might be asking yourself: “Why use a load balancer if our architecture has just an EC2 instance?”. And that’s a perfectly valid question.
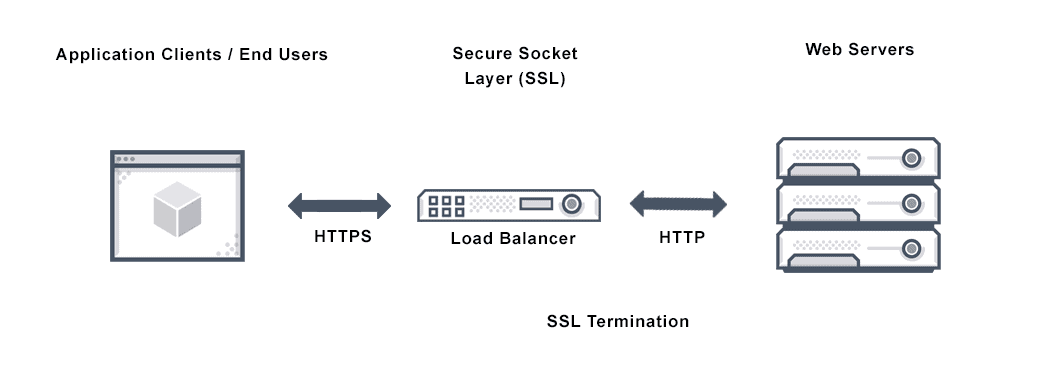
In our current architecture, the load balancer won’t actually be “balancing” requests, its main purpose will be SSL/TLS Termination. It’ll intercept encrypted HTTPS traffic, decrypt it, and then forward HTTP requests to our EC2 instance.
In short: our Load Balancer represents the end of an SSL connection.
But that’s not the only benefit. Using a Load Balancer is also essential for scalability. If our application explodes in popularity, we can easily add more EC2 instances to handle the high volume of users. The Load Balancer will then automatically distribute the increased traffic among all of them.
2.7.1 Defining where to send traffic: the target group
First, we need to create a target group that includes all our EC2 instances (in our case, just one).
Go to EC2 -> Target Groups -> Create target group and configure it as follows:
- Target type: Instances
- Supports load balancing within the VPC where our EC2 instances are configured.
- Also makes it easier to use auto scaling (we won’t use it here, but it’s very useful for real-world projects).
- Protocol: HTTP
- The idea is to enable HTTPS on the Load Balancer, not directly on the EC2 instance. The LB will receive the HTTPS request and forward it as HTTP to EC2. This simplifies the setup in scenarios where scalability is important.
- Port: 80
- IP address type: IPv4
- VPC: Select the VPC where your instances are located.
- Protocol version: HTTP
- Health check: HTTP on path /health
Click “Next”, select the instances that will be part of the target group (in our case, our single EC2 instance), and click “Include as pending” below. Create the target group.
2.7.2 Configuring the Load Balancer
Now, let’s create the Load Balancer.
Go to EC2 -> Load Balancers -> Create load balancer and configure it as follows:
- Type: Application Load Balancer
- We need to operate at the request level, routing packets to EC2 instances.
- Scheme: Internet-facing
- We need the DNS to resolve our domain to a public IP.
- IP address type: IPv4
- VPC: Select the VPC where your instances are located.
- Availability Zones: Check at least two.
- Security groups: Create or select a set of rules that expose ports 80 and 443 to all sources.
- Listeners: Add an HTTPS listener on port 443, set the default action to Forward to, and select the target group we created earlier.
- We’ll redirect HTTP requests to HTTPS after the LB is created.
- Certificate: Select the certificate issued by ACM.
Create the Load Balancer.
Optional but recommended: Once the LB is created, select it, go to the Listeners and rules tab, and add an HTTP listener on port 80. Set the default action to redirect to an HTTPS URL, port 443, with status code 301 (Moved Permanently). This ensures that any HTTP request is redirected to HTTPS.
Security tip: The EC2 instance’s security group should only allow traffic on port 80 coming from the Load Balancer, since the LB will handle all external HTTP/HTTPS requests and forward them to the instance.
Here’s a simple diagram showing how the load balancer works:
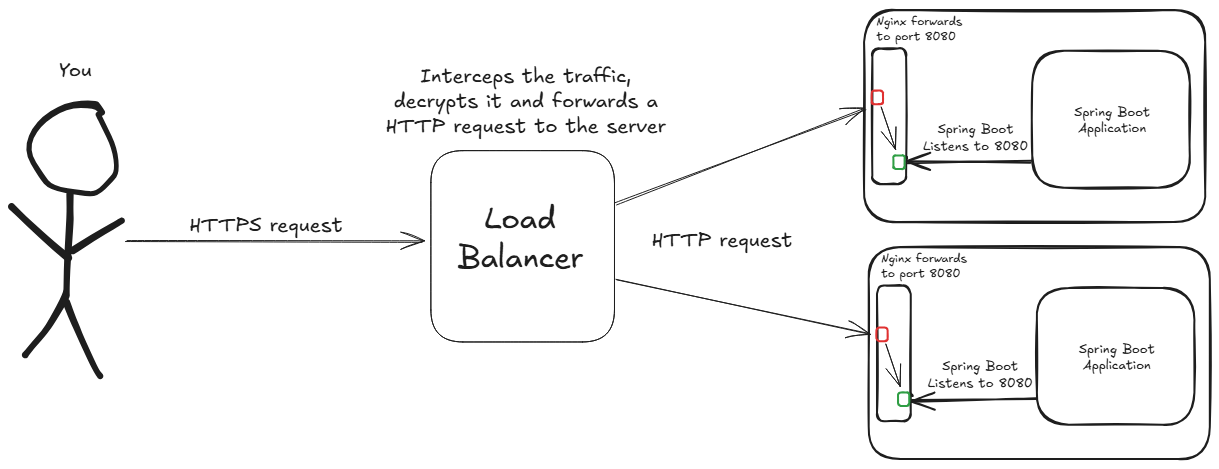
Keep in mind: Although the diagram shows two instances to illustrate the concept, our current setup uses just one EC2 instance. The architecture is, however, fully prepared to scale by adding more instances as needed.
2.7.3 Pointing your domain to the Load Balancer
To finish this section, go to your Route 53 settings and update the A record. Delete the old record and create a new one:
- Record name: api
- Record type: A
- Important: enable the Alias toggle, which allows selecting our LB instead of entering an IP address.
- Route traffic to: Select Alias to Application and Classic Load Balancer, choose the region that your EC2 is instanciated, and select our Load Balancer.
- Routing policy: Simple routing.
Once the record is created, wait for DNS to propagate so that api.{your-domain} resolves to the Load Balancer.
From the terminal, you can verify HTTPS is working:
curl -I https://api.{your-domain}/healthIt should return 200 with valid headers.
If you configured the HTTP -> HTTPS redirect, try:
curl -I http://api.{your-domain}.com/healthIt should return 301 with a location header pointing to https://{your-domain}.
2.8 Production-ready frontend: CDN with CloudFront
Amazon CloudFront is a Content Delivery Network (CDN) service that delivers content to users with low latency and high transfer speeds. It works by caching copies of your files (HTML, CSS, JavaScript, images, videos, etc) in a global network, serving them from the location closest to the user. This reduces load on your origin servers (such as S3 buckets or EC2 instances), improves performance, and adds built-in features like HTTPS and integration with other AWS services such as Route 53 and ACM.
Now that our API is secured with ALB (Application Load Balancer) + ACM (Amazon Certificate Manager), it’s time to give our frontend a production-grade setup using CloudFront + S3 + your custom domain.
2.8.1 Requesting another certificate
First, we need to request another certificate. This time, the fully qualified domain name will be {your-domain} and www.{your-domain}. (Eg. “example.com” and “www.example.com”)
Choose DNS validation, create the CNAME records in Route 53 when prompted, and wait until the certificate status changes to Issued.
2.8.2 Making our S3 private
We’ll serve the frontend through CloudFront, so the S3 bucket must remain private:
- In Block public access, keep all options enabled.
- Disable Static website hosting.
2.8.3 Creating our CloudFront distribution
To create a CloudFront distribution, go to CloudFront -> Distributions -> Create distribution.
We’ll setup ou distribution as follows:
- Distribution name: …
- Distribution type: Single website or app
- Origin type: Amazon S3
- It will allows us to select or S3 bucket as origin.
- Origin: Select our S3
After creating it, go to General -> Settings and update it:
- Check if “Alternate domain names” have your two domains
- Price class: “Use Only North America and Europe” (minor cost) or “Use All Edge Locations” (global and high-performance)
- Custom SSL certificate: select the certificate you just requested
- Default root object: index.html
- It will remove the necessity of adding “/index.html” after your domain name
After it, CloudFront will give us the bucket policy that we need to set on our S3 bucket. Just copy and paste it on S3 -> Bucket -> Permissions -> Bucket policy.
2.8.4 Final adjustments
Go to Route 53 -> Hosted zones -> Your hosted zone and add two A records:
- {your-domain}
- Record name: don’t add any subdomain
- Record type: A
- Enable “Alias”
- Value: points it to your CloudFront distribution
- www.{your-domain}
- Record name: “www”
- Record type: A
- Enable “Alias”
- Value: points it to your CloudFront distribution
Side note: remember to add both records (https://{your-domain} and https://www.{your-domain}) to the cors.allowed-origins environment variable on your EC2 instance and restart the service.
Wait for the DNS propagation.
After waiting for DNS to propagate (usually 5-15 minutes), open https://{your-domain} in your browser. Your production-ready frontend should be live!
3. Conclusion
It’s been quite a journey, from a single application file on our local machine to a fully deployed and scalable service running in the AWS cloud. If you’ve followed along this far, congratulations! In this final section, we’ll review our final architecture and then discuss some key next steps for making this deployment even more robust.
3.1 Final architecture
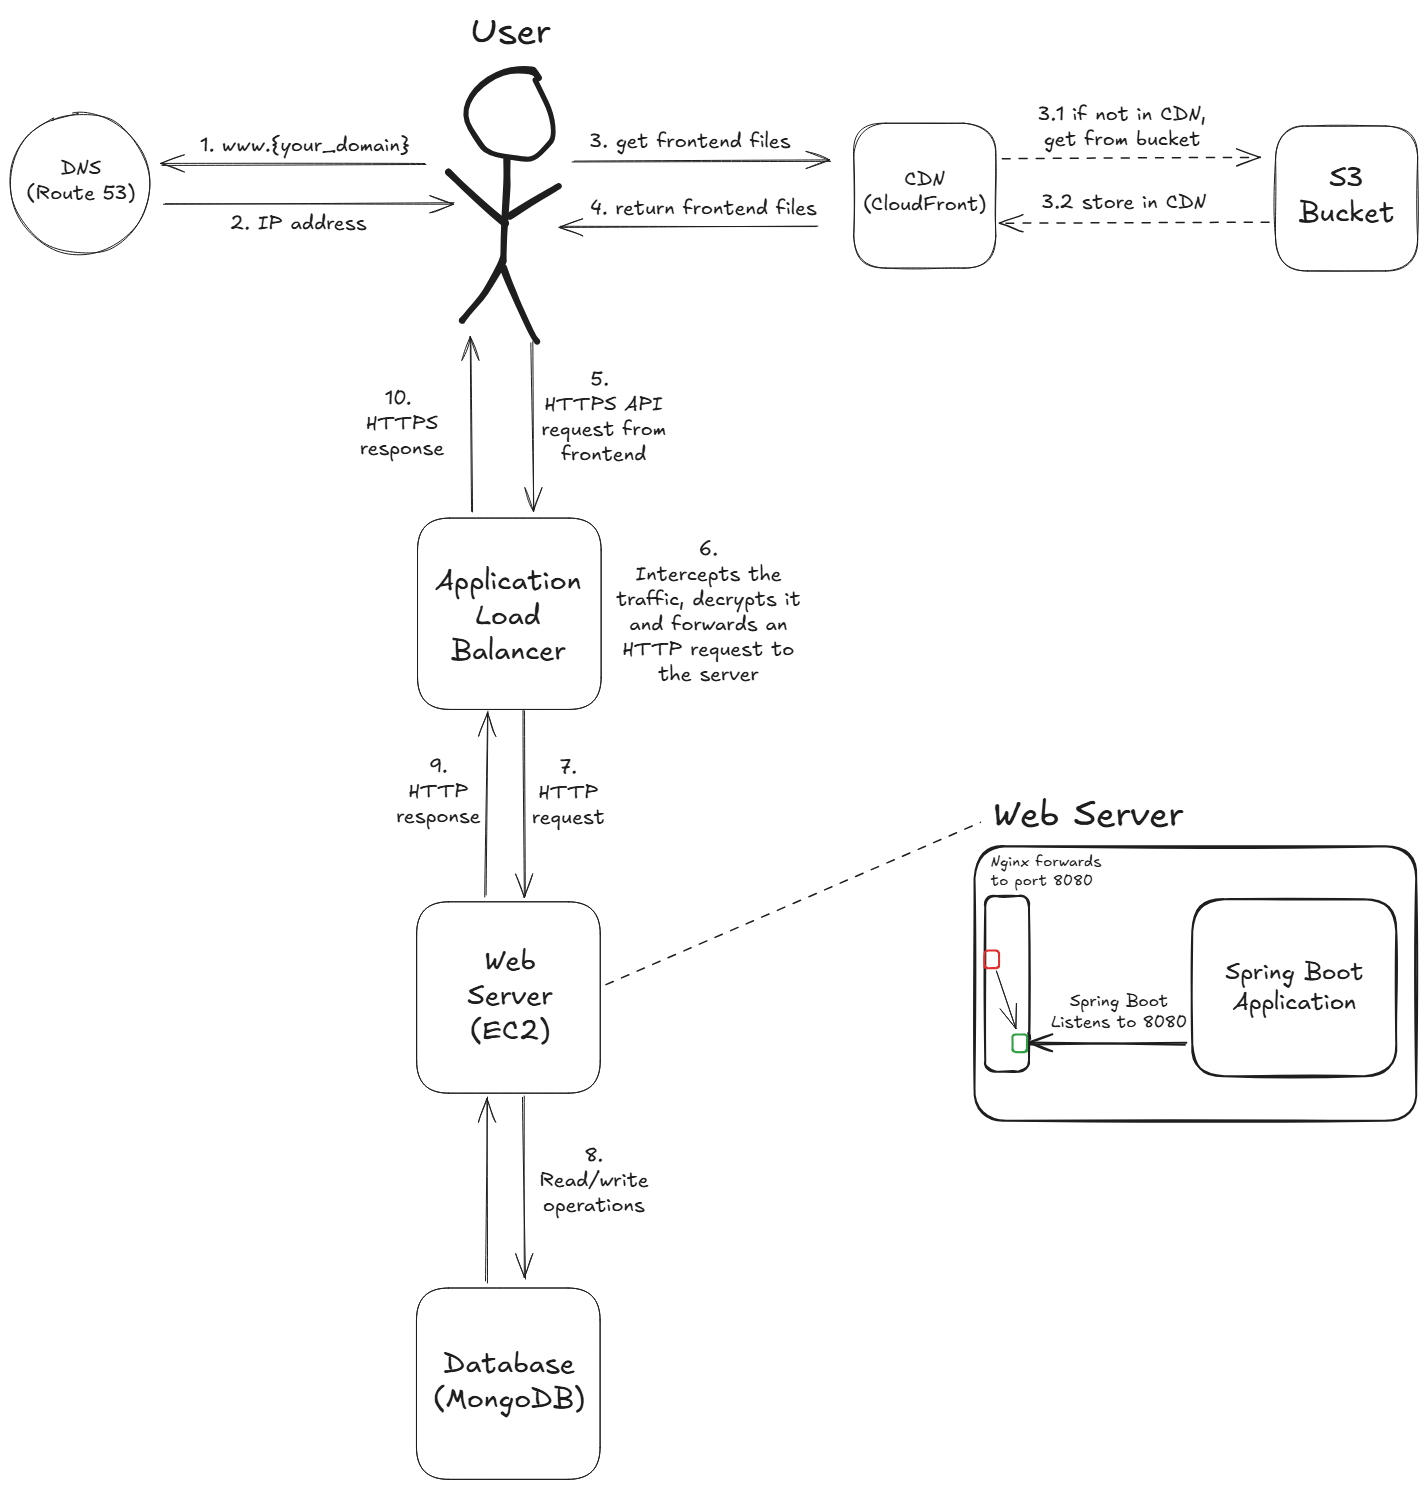
- DNS Lookup (frontend): the user enters www.{your_domain} into their browser. The browser sends a request to Route 53 (our DNS service) to find where the domain is located.
- DNS Response: Route 53 responds with the address of the CloudFront distribution that serves our frontend application.
- Request Frontend: the user’s browser makes a request to the CloudFront CDN to get the website’s files (HTML, CSS, JavaScript).
- 3.1 & 3.2 (cache logic): if the files aren’t already in the CloudFront cache location closest to the user (a “cache miss”), CloudFront retrieves them from the origin S3 Bucket and then caches them for future requests.
- CDN Delivery: CloudFront serves the frontend files to the user with low latency.
- API Request: the frontend application, now running in the user’s browser, makes a HTTPS API call to api.{your_domain} to interact with the backend.
- SSL/TLS Termination: the Application Load Balancer (ALB) receives this encrypted request. It performs SSL/TLS Termination, meaning it decrypts the traffic.
- Forward Request: the ALB forwards the request as a standard, unencrypted HTTP request to a healthy EC2 instance in the target group (in our case, the only one).
- Process Request: the Spring Boot application running on the EC2 instance processes the business logic, which may involve read and/or write operations with the MongoDB Database.
- Backend Response: the EC2 instance sends an HTTP response back to the Application Load Balancer.
- Final Response: the ALB re-encrypts the response and sends it back to the user’s browser as a HTTPS response, completing the API call cycle.
3.2 Job’s not finished: future improvements
This deployment was a incredible learning experience, but the journey of building a real-world application never truly ends. Here are the next steps I have in mind to make our project even more robust and professional:
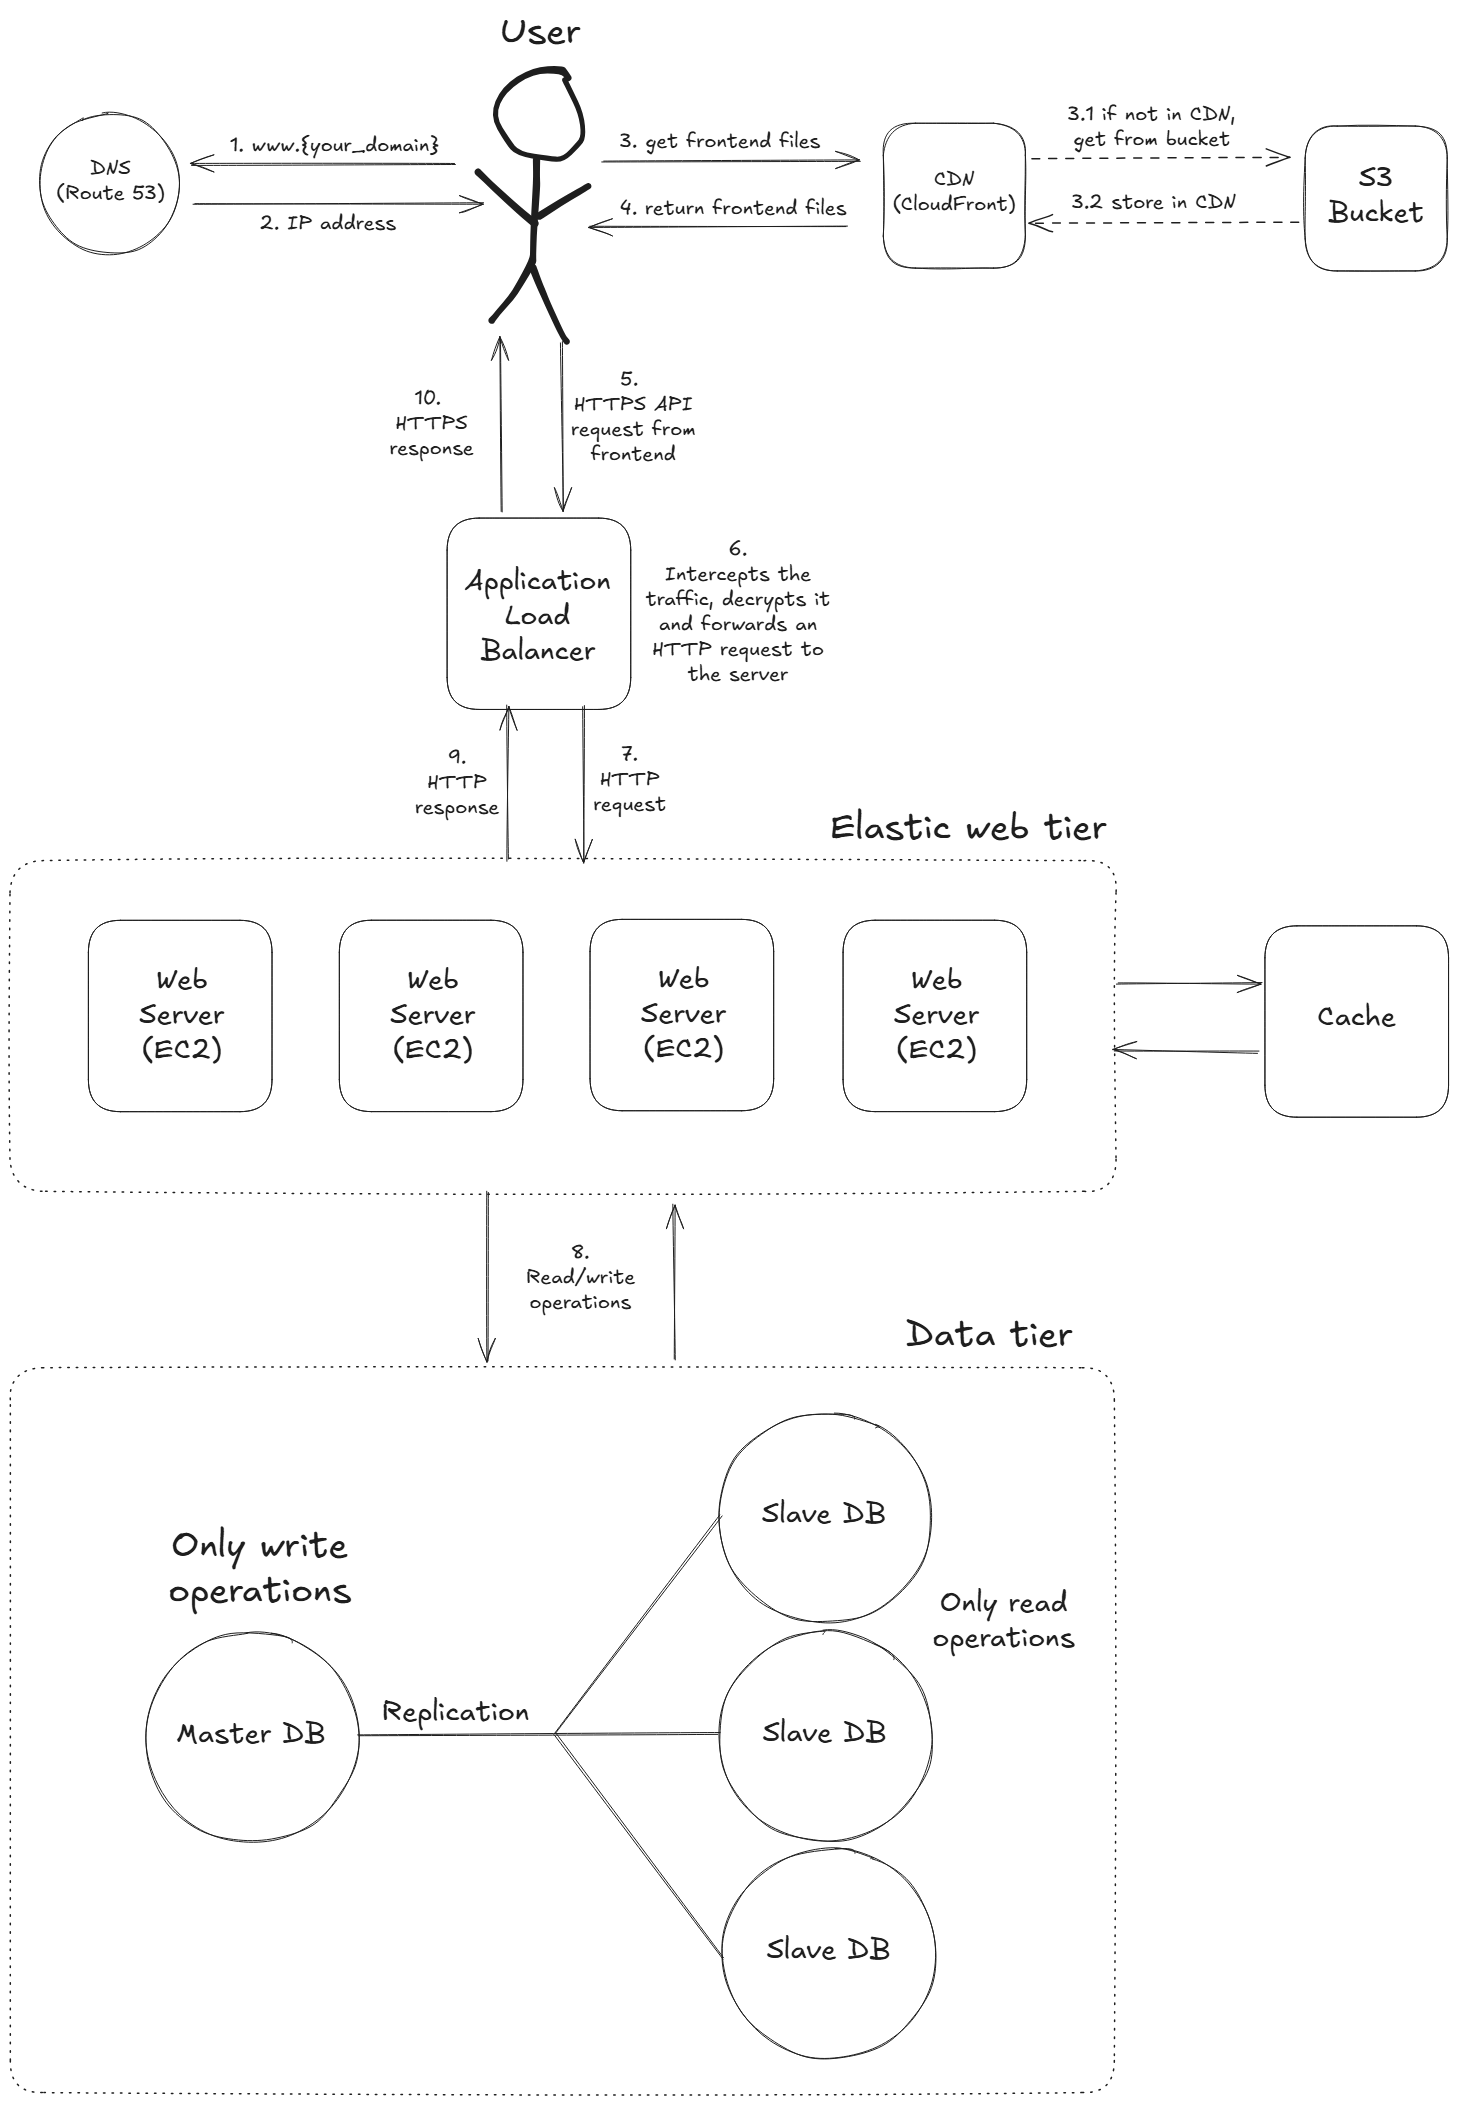
3.2.1 Architectural improvements
- Amazon EC2 Auto Scaling: automatically adjusts the number of EC2 instances in response to traffic demand, ensuring performance during peaks and saving costs during low usage.
- Backend cache: store frequently accessed data in a cache (e.g., Redis) to reduce backend load and improve response times.
- Database replication: keep multiple synchronized copies of the database for high availability, failover support, and better read performance.
After these improvements, our architecture should look like this:
3.2.2 DevOps improvements
- IaC: define and manage the infrastructure with code (e.g. Terraform) for reproducible and automated deployments.
- CI/CD: automate building, testing, and deploying code changes, reducing manual work, enabling faster and safer releases.
- Containerization: package our application and its dependencies on a container (e.g. Docker), making it portable, consistent, and easier to deploy.
- Many more: expand with monitoring (CloudWatch), observability (Grafana), advanced security measures (WAF), and cost optimization strategies.
3.2.3 Final thoughts
After days working on this project and writing this article, we got from a single file running locally to a fully functional and scalable application in the AWS cloud. Along the way, we explored core AWS services, implemented a secure architecture, and set the foundation for future improvements.
If you’ve followed along, I hope you not only have a working deployment but also a deeper understanding of how these AWS components fit together.
That’s all for now! Thanks for reading, and see you in the next one.